*This post may contain affiliate links. Read more »
Pierogies are one of those things a lot of folks are scared to make, until you try 'em out and see how friggin' easy they are to make. This vegan pierogies recipe has tender, delicious dough, stuffed with potatoes, roasted garlic, and fried onions. I've made the steps for prepping and cooking them effortless, even if you sorta suck at cooking.


Enter your email & I'll send it to your inbox. Plus, get great new recipes from me every week!
By submitting this form, you consent to receive emails from Cinnamon Snail.
These delightful, doughy dumplings are a natural companion for a hot bowl of vegan chicken soup, escarole and bean soup, or to serve with some round challah for Rosh Hashanah. Traditionally filled with potatoes, cheese, or meats, this completely vegan version still pays homage to my Polish, Russian, Ukrainian, and Hungarian roots (yeah, I'm quite a bit of an Eastern European mutt), without harming a single adorable critter.
Whether you're a professional cook or brand new to making dumplings, this recipe is designed to guide you through the process without stress or headaches. You can also learn this recipe and prep it along with me in my on-demand vegan Eastern European cooking class. So, roll up your sleeves and let's make some vegan pierogies that blow anything you can find at a supermarket out of the dang water!

![]()
These were amazing!!! I have made vegan pierogi many times before (don't tell my relatives...) but these were the best! The dough was great to work with and the pierogi cooked up very well. Thanks!!!
Jump to:
😍 Why you'll adore this Vegan Pierogi recipe
🧄 Flavor Packed with Roasted Garlic: Roasting the garlic whole before mashing it into the filling gives you a more diverse garlic flavor. The outer part of the garlic gets sweet and lightly caramelized, while the inside of the garlic is robust and steamy.
🛒 Made with Pantry Staples: You won't need to hunt down any obscure ingredients; everything in this recipe is likely already in your pantry or available at local grocery stores almost anywhere on the planet.
✅ Tested and Approved Worldwide: Like all of my vegan Jewish recipes, after improving and perfecting this one for decades, I shared it with a team of recipe testers across the globe who nailed it on their first try, long before I ever dreamed of sharing it online.

👉 Steal my most popular vegan Jewish recipes!
This 5-day guide to supremely bangin' plant-based Ashkenazi cooking is 100% FREE, & you'll love it so much 🥰
🥔 Vegan Pierogi ingredients

Garlic
Roasted garlic (czosnek in Polish) becomes sweet and caramelized, adding depth to the pierogi filling. Not into garlic in your pierogies? Another fun option is to add a few tablespoons of vegan cream cheese to the filling instead, making it more rich.
The Potatoes
I am a big fan of making these with russet potatoes because they are less waxy, which is why I use them in my dairy-free mashed potatoes too. You can for sure use Yukon gold potatoes, but the flavor of those is better suited for making vegan knishes, in my opinoin at least.
Unsweetened Plant-Based Milk
You can make this recipe using either soy milk, almond milk, or oat milk. Just make sure that it's unflavored and unsweetened.
The Flour
For sure these work best with all-purpose flour. If you are crazy careful, you can actually make these gluten-free using an all-purpose gluten-free flour. I'd just suggest air-frying the pierogies instead of frying them in oil if you make them gluten-free because they will get hustled less that way and will be less likely to rupture.
Vegan Sour Cream
While this is kinda optional-the only condiment I like to serve these with as much as my gloriously easy, tofu-free vegan sour cream recipe is homemade applesauce. So do one, or both of those things, ok?
*See the recipe card at the bottom of the page for exact quantities, nutritional info, and detailed cooking directions.
🤯Variations
Sauerkraut and Mushroom Pierogi (Pierogi z Kapustą i Grzybami):
A traditional Polish pierogi filling (instead of the potatoes, garlic, and onions), roasted wild mushrooms mixed with drained sauerkraut make a killer filling! Oyster mushrooms (which are my go-to for making everything from vegan shawarma to tom yum fried rice) or lion's mane mushrooms (which also make absurdly yummy vegan fajitas) are sorta my top choices, but you could rock these out with cremini or boring ol' button mushrooms too.
Truffled Potato Pierogies
Just add a heaping tablespoon of good-quality, natural truffle oil and a couple of teaspoons of nutritional yeast (the cheesy flakes that give my vegan nacho cheese its funkiness) to the filling. My fave is from a company called Da Rosario.
Vegan Sausage Pierogies
Add some lightly browned vegan sausage to the potato filling. Remember, if you are adding more bulk, you might end up with a little more filling than you need. So either make extra dough or cut back slightly on the potatoes to avoid waste.

Grab my easy-yo-use app that builds your whole week with real, chef-tested vegan dinners in 30 seconds, customized to your budget, time, and taste, with a shopping list sorted by aisle.

📖 How to make vegan pierogies
Nail these boiled or steamed Polish dumplings on your first shot by following these step-by-step photos with helpful tips. Or scroll down to the bottom of this page for the easy-to-print recipe card.

Step One
Roast Busters:
Preheat your oven to 350°F (175°C). Toss the peeled garlic cloves with 1 tablespoon of olive oil in a small bowl, then spread them out on a parchment-lined baking sheet.
Roast for 12-14 minutes until they're lightly golden and fragrant. Remove from the oven and let cool.

Step Two
Air Spud-Golden Receiver:
Meanwhile, peel and quarter the potatoes, then drop them into a pot with water to cover.
Once the pot reaches a rolling boil, cook the potatoes for 7-8 minutes over high heat until they're fork-tender. Drain in a colander and set aside.

Step Three
Sauté-braham Lincoln:
Heat olive oil in a sauté pan over medium-high heat. After 90 seconds, when the oil is hot, stir in the diced onion and sauté, stirring frequently, for 7 minutes until they're golden brown and fragrant. Turn off the heat.

Step Four
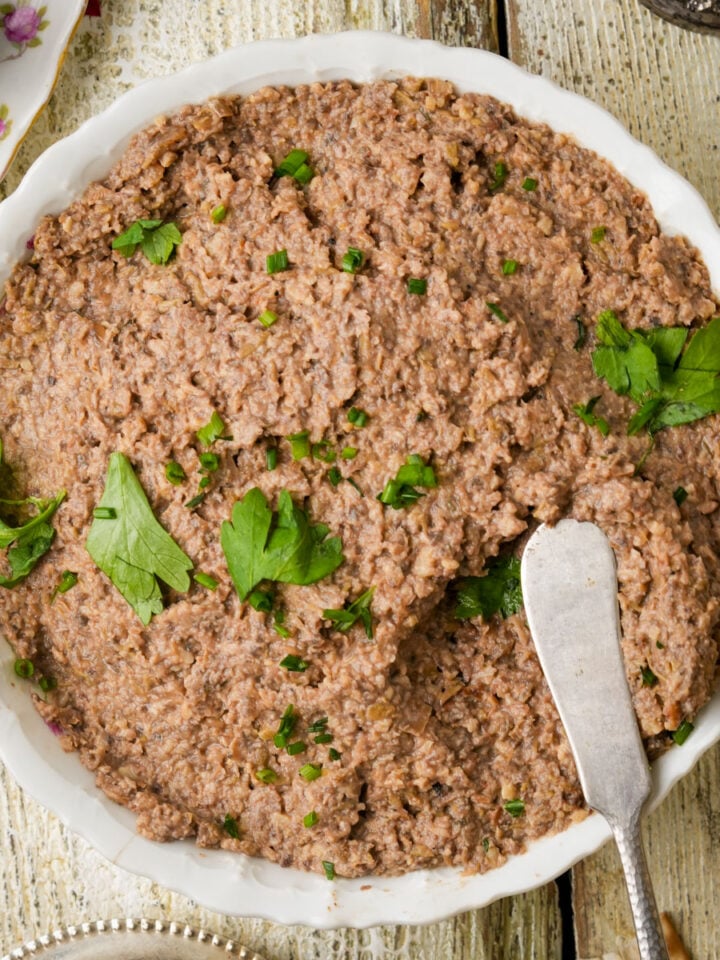
We Did the Garlic Mash:
Add the cooked potatoes, roasted garlic, unsweetened plant-based milk, and salt to the pan of cooked onions. Grab your trusty potato masher and mash until well-mixed, with the cloves of roasted garlic well broken down.

Step Five
Dumpling Dough Cry For Me Argentina:
In a large bowl, combine flour, vegan sour cream, black pepper, olive oil, and salt. Gradually add 1 cup of water while mixing on low speed until a firm, slightly tacky dough forms. Knead for 4 minutes by hand (or let your stand mixer, fitted with a dough hook attachment, do the work for 2-3 minutes) to develop the gluten.
Step Six
Flat Stanley:
Scrape the soft pierogi dough out of the mixing bowl onto a lightly floured surface. Roll the dough out into a large rectangle, about ⅛ inch thick.
Step Seven
I'll Cut You:
Use a 2-inch-wide biscuit cutter, cookie cutter, or a glass with a reasonably thin and sharp rim to cut circles. Re-roll scraps as needed.
✅ Use a floured bench scraper or a thin spatula to make sure none of your dough circles stick to your work surface.
Step Eight
Stuffington Post:
Place a heaping tablespoon of filling in the center of each circle. If your dough is dry feeling, use a finger or brush to wet the edges with a little water. Fold into a half-moon shape, and pinch or fork-seal the edges. Move your formed pierogies to a floured tray until ready to cook.
✅ If you are planning to freeze your pierogies to cook later, you can freeze them individually on the floured tray first. Then, after a few hours, when they are frozen solid, transfer them to a freezer bag or container-that way, they don't stick together and become one horrifying contiguous pierogi monster.
✅ If you are prepping other things before it's time to cook the pierogies, keep the little dumplings covered with a damp kitchen towel so they don't dry out.

Step Ten
How to Cook Pierogies:
If pan-frying, heat ¼ cup olive oil in a large skillet over medium-high heat. After about 2 minutes, when the oil is hot, fry the pierogies in batches for 2-3 minutes per side until golden brown and crispy. I find sometimes you need to toss them about a bit to get all edges of the dough nicely browned.
Otherwise, if you prefer to steam or boil the pierogies, heat a large pot of salted water over high heat until boiling. If steaming, add a lightly oiled steamer basket that holds the pierogies over the surface of the boiling water. Boil pierogies for 6-7 minutes until they rise to the top, then carefully transfer them to a colander with a slotted spoon. If steaming, allow a few minutes more until the dough looks cooked through. Salt the cooked pierogies before serving them.

Step Eleven
Serve the Pierogi Party:
Transfer to a wire rack to drip off any excess oil, and then sprinkle with a little salt.
Plate these beauties topped with fried onions or a dollop of vegan sour cream. You can also serve them with hot sauerkraut or fresh cucumber dill pickles.
Whether you're channeling your inner Polish grandma or just looking for some kid-friendly comfort food to dish out, these pierogies are going to make you super-happy!
💡 Servings Ideas
These bad boys go great with some vegan matzo ball soup, although they aren't kosher for passover, so don't be slinging 'em then, OK?
They make a classic side to go with vegan schnitzel or vegan corned beef (especially if you are rocking either of 'em with sauerkraut).
Other Jewish acompanyments you can rock them with are charoset, kasha varnishkes, vegan potato kugel, vegan cholent, and tzimmes.
👉Top tips
- Choose the Right Potatoes: Opt for russet potatoes due to their low moisture content, which yields a fluffier filling. Avoid waxy varieties, as they can result in a denser texture.
- Mind the Dough Thickness: Roll out the dough to about ⅛ inch thickness. Dough that's too thick can overpower the filling, while overly thin dough may tear during cooking, letting in grease or letting the filling spill out.
- Seal with Precision: Ensure the pierogi edges are sealed tightly to prevent filling leakage during cooking. A light brush of water (only if the dough feels dry to the touch) around the edges before pressing can improve the seal. Making sure none of the filling gets in the way of the seal is important too. Even small pieces of onion will break the seal and cause your little dumplings to open.
- Optionally, Blanch Before Frying: Boil the pierogi for a few minutes and then drain them. This optional step makes sure the dough is fully cooked before the final frying for a crispy exterior.
- Avoid Overcrowding the Pan: When frying, cook the pierogi in batches to maintain consistent heat and achieve an even, golden-brown crust. Overcrowding can lead to occasionally torn pierogies, a trickier time flipping, and sometimes greasy results.
🤷♀️ Recipe FAQs
Yes, and while a little more wholesome, it will result in a denser, drier pierogi texture. Consider using a mix of whole wheat and all-purpose flour for a balance of flavor and tenderness.
After boiling, toss them lightly in oil or vegan butter to prevent sticking. Alternatively, place them on a parchment-lined tray in a single layer to cool.
Absolutely. Arrange them in a single layer on a baking sheet to freeze, then transfer to a freezer-safe bag. Boil directly from frozen when ready to cook.
When boiling, pierogi are done when they float to the surface, typically after 2-4 minutes. For added texture, you can then pan-fry them until golden brown.
If you want to consume less oil, you can bake pierogi by brushing them with oil and placing them on a parchment-lined baking sheet at 375°F (190°C) until golden brown. Honestly, I think air frying is a better option if you have one.
❄️ Refrigerating:
Transfer cooled pierogies to an airtight container and refrigerate for up to 4 days. Separate layers with parchment paper to prevent sticking.
🥶 Freezing:
Arrange uncooked or cooked pierogies in a single layer on a parchment-lined tray and freeze until solid. Once frozen, transfer to a reusable, freezer-safe container or bag. Pierogies can be frozen for up to 3 months.
🌡️ Thawing:
To thaw, transfer pierogies from the freezer to the refrigerator and let them defrost overnight. Alternatively, you can cook them directly from frozen, adjusting cooking time as needed.
🔥 Stovetop Reheating:
For cooked pierogies, heat a drizzle of oil or vegan butter in a frying pan over medium heat. Reheat pierogies for three to four minutes per side until warmed through and crispy. For boiled pierogies, toss them in a pan with a bit of vegan butter and gently warm over low heat for 4-5 minutes, stirring occasionally.
⚡️ Microwave Reheating:
Place pierogies on a microwave-safe plate and cover with a damp towel to retain moisture. Microwave on medium power for 1-2 minutes, checking to ensure they're evenly heated. Avoid microwaving too long to prevent the dough from drying out.
✌️You'll love these potato recipes too:


Learn the secrets to perfect falafel in this fun cooking class with Chef Adam Sobel!


Easy Vegan Pierogies (Fried Onion and Potato)
Equipment
- stand mixer (optional)
Ingredients
Filling
- 16 cloves garlic peeled
- 1 tablespoon olive oil
- 4 russet potatoes medium size, 1.5 lbs., peeled
- 2 tablespoons olive oil
- 1 cup yellow onion diced
- 3 tablespoons unsweetened plant-based milk
- 1 teaspoon salt or to taste
Dough
- 3 cups all-purpose flour
- ¼ cup vegan sour cream (store-bought, or homemade)
- ¼ teaspoon ground black pepper
- 4 teaspoons olive oil
- ½ teaspoon salt
- 1 cup water room temperature
Instructions
- Preheat oven to 350°F (175°C). Toss the peeled garlic with the tablespoon of olive oil in a small bowl, and then place them onto a parchment paper-lined baking tray. When the oven reaches 350°F, roast the garlic for 14 minutes until lightly golden. Remove from the oven and set aside to cool.
- Quarter the potatoes and place them in a pot along with 4 cups water. Bring the water to a boil, and allow the potatoes to cook for about 7-8 minutes, until the potatoes are fork-tender. Drain the potatoes in a colander.
- Heat the olive oil in a sauté pan over medium-high heat. Once the oil is hot, fry the onion in the oil, stirring regularly for about 7 minutes, until they are nicely browned. Turn off the heat.
- Add the potatoes, garlic, almond milk, and salt to the pan. Mash until smooth with a potato masher.
- Combine the flour, sour cream, pepper, oil, and salt in a mixer. Gradually add 1 cup water while the mixer is running at a low speed, until you have just formed a firm but not very sticky dough. Continue mixing at low speed for 2 more minutes to develop the gluten. Alternatively, you can mix the dough by hand, kneading for about 4 minutes.
- On a floured work surface, roll out the dough to about ⅛ inch thickness. Using a 2-inch-wide biscuit cutter or water glass, cut circles out of the dough. (You can re-roll the scrap dough to make more pierogies.)
- Place a heaping tablespoon of the filling in the center of each circle of dough. Gently wet the perimeter of each circle with a finger or a pastry brush dabbed in warm water.
- Fold the circles of dough in half over the filling to form half-moon shapes, being careful not to push the filling out into the edges of the pierogies, which makes their seal weak. Use a fork or firm pinch of the fingers to press the top and bottom edges together. As you work, transfer the sealed pierogies onto a lightly floured cutting board or baking sheet.
- You can steam or boil the pierogies if that's your preference. Otherwise, to fry them, heat ¼ cup of olive oil in a large frying pan over medium-high heat. Once the oil is hot, fry the pierogies for 2 to 3 minutes per side until they are golden brown. Remove the cooked pierogies and pat dry of excess oil with a paper towel. Salt the pierogies to taste.
Notes
Enter your email & I'll send it to your inbox. Plus, get great new recipes from me every week!
By submitting this form, you consent to receive emails from Cinnamon Snail.

Whitney says
These were amazing!!! I have made vegan pierogi many times before (don't tell my relatives...) but these were the best! The dough was great to work with and the pierogi cooked up very well. Thanks!!!
Bryan Shaw says
These turned out so great! My kids were begging for more! Highly recommend these!
hg says
Great comfort food. Can never go wrong with a potato dish. I also served them along with the borscht, which made a complete meal. Freeze well too! So now I have a few future dinners stocked in the freezer.
Katie says
We loved the potato and onion pierogies. It's something I had never made or even tasted before. The recipe was easy to follow, the pierogies were delicious and fun to make. They went so good with the borscht!