*This post may contain affiliate links. Read more »
Has Huy Fong's numerous changes to their recipe and process left you missing the old stuff? This homemade sriracha sauce is a very well tested and researched emulation of the original formula you have been looking for. It's just the right amount of spicy, garlicky, sweet and tangy, and the texture and color are just like Sriracha used to be! Plus, it's super simple to make, even if you have never made a hot sauce before in your life, or generally sorta suck at cooking!

Enter your email & I'll send it to your inbox. Plus, get great new recipes from me every week!
By submitting this form, you consent to receive emails from Cinnamon Snail.
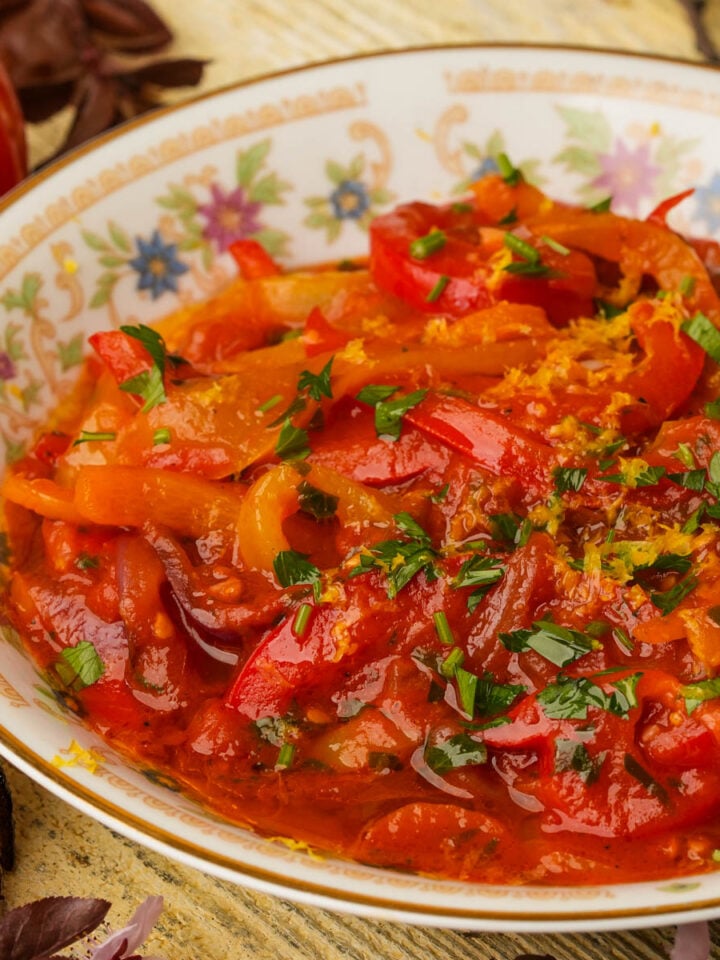
You might think making your own rooster sauce is gonna be an annoying, messy process, but it's worth every second. This recipe checks all the boxes: easy, reasonably long-lasting, and insanely delicious. Like my New Mexico red chili sauce, vegan buffalo sauce, and nam prik pao, this sauce is flavor first, and makes it easy to liberate yourself from store-bought hot sauces!
This recipe is foolproof, and you'll nail it on your first try. Gather your ingredients, roll up your sleeves, and get ready to make those last few drops of store-bought sriracha withering in your fridge feel embarrassed about themselves.
Jump to:
Why you need to learn to make your own Sriracha!
Sriracha sauce, known for its bright red color and spicy kick, originates from the coastal city of Si Racha in Thailand. The sauce, which he called Sriraja Panich was initially crafted in the 1940s by a local named Thanom Chakkapak, who created a chili sauce that quickly gained popularity. This early version of sriracha was thicker than you might expect sriracha to look like, more like ketchup, and it was used primarily as a dipping sauce for seafood.
But standing on the shoulders of giants, the sriracha sauce we know today owes most of its global fame to Huy Fong Foods, founded by David Tran. Tran, a Vietnamese immigrant, started Huy Fong Foods in Los Angeles in the early 80s. Naming his company after the freighter that brought him to America (which translates to "gathering prosperity"), Tran began producing his version of sriracha as well as a now-famous sambal oelek recipe.
Having no artificial ingredients or preservatives, it became an instant hit in the local Asian markets. The iconic green-capped bottle with the rooster logo, a nod to Tran's astrological sign, soon became a recognized symbol of quality and flavor.
Huy Fong's sriracha quickly outgrew its niche market, finding a place in mainstream American cuisine. It became a versatile condiment used in everything from Vietnamese pho, Japanese ramen to vegan fried chicken and pizza. This surge in popularity, however, brought challenges. Huy Fong Foods faced significant issues keeping up with the demand, leading to shortages and increased market prices.
One of the major challenges was sourcing fresh red jalapeño peppers, the primary ingredient in sriracha. The company relied on a single supplier, Underwood Ranches, which could not always meet the growing demand. In 2017, Huy Fong stopped using Underwood for their peppers, and many folks feel like the sauce hasn't been the same since then.
Over the years, Huy Fong has played with their recipe, trying to keep up with demand with a few similar pepper varieties such as Fresno, and also processing it with and without the stems for efficiency and cost saving.
In 2013, the company faced their most significant hurdle when residents near the Irwindale, California plant complained about the intense chili pepper odors emanating from the factory. The city filed a lawsuit, and the plant temporarily shut down, causing a sriracha shortage that sparked panic among fans of the sauce.
Huy Fong halted their production in 2022, and the decrease in supply caused the pricing of a single bottle of Sriracha to skyrocket to over $30. 😳
So, if you are downright addicted to this masterpiece sauce, it behoves you to learn how to make the stuff so you can guarantee an unending supply!

🤘learn to make insanely flavorful sauces
This guide to my most popular vegan sauce recipes is 100% FREE, & you'll love the actual heck out of it 🥰
What Red Chilies are Used for Sriracha?

While you can get away with using either red jalapeno peppers or Fresnos in this recipe, since we are trying to emulate the original Huy Fong sriracha here, we are going to go with the slightly fruitier, slightly more juicy red jalapeños for this.
But after a LOT of testing, I still wasn't feeling like the heat and sweetness balance was just right. That's why my recipe incorporates a small amount after bird's eye chilies (aka red Thai chilies). This was the winning ticket to making the sauce absolutely slap.
Honestly, while's you can totally make this recipe using Fresnos, I would suggest you use those instead to make another Huy Fong classic hot sauce- the chunkier, thicker Sambal Oelek!
🥰Why you'll adore this recipe
🧂 Perfect Balance of Sweet and Heat: The combination of sugar and vinegar in this recipe helps balance the intense heat of the peppers, creating a well-rounded flavor, especially when the initial fermentation makes the peppers taste naturally sweeter and more robust.
⏲️ Quick and Easy: While it takes a couple of days to get the finished sauce, other than the time taken to seed the peppers, this recipe takes hardly more time than making a smoothie.
🌶️The OG Bold Flavor: Using a mix of fresh Fresno chilies with a small amount of bird's eye chilies added gives this sriracha its vibrant color and robust flavor. The fact that these peppers are stemmed and seeded first makes for the cleanest, sweetest flavors and smoothest texture ever!
✅ Tested and Approved Worldwide: Like all of the vegan sauce recipes I share, this sriracha was perfected and then tested by a massive team of over 400 home cooks worldwide before I published it. The feedback was unanimous: it's a hit!

Grab my easy-yo-use app that builds your whole week with real, chef-tested vegan dinners in 30 seconds, customized to your budget, time, and taste, with a shopping list sorted by aisle.

🌶️ Ingredients for Sriracha
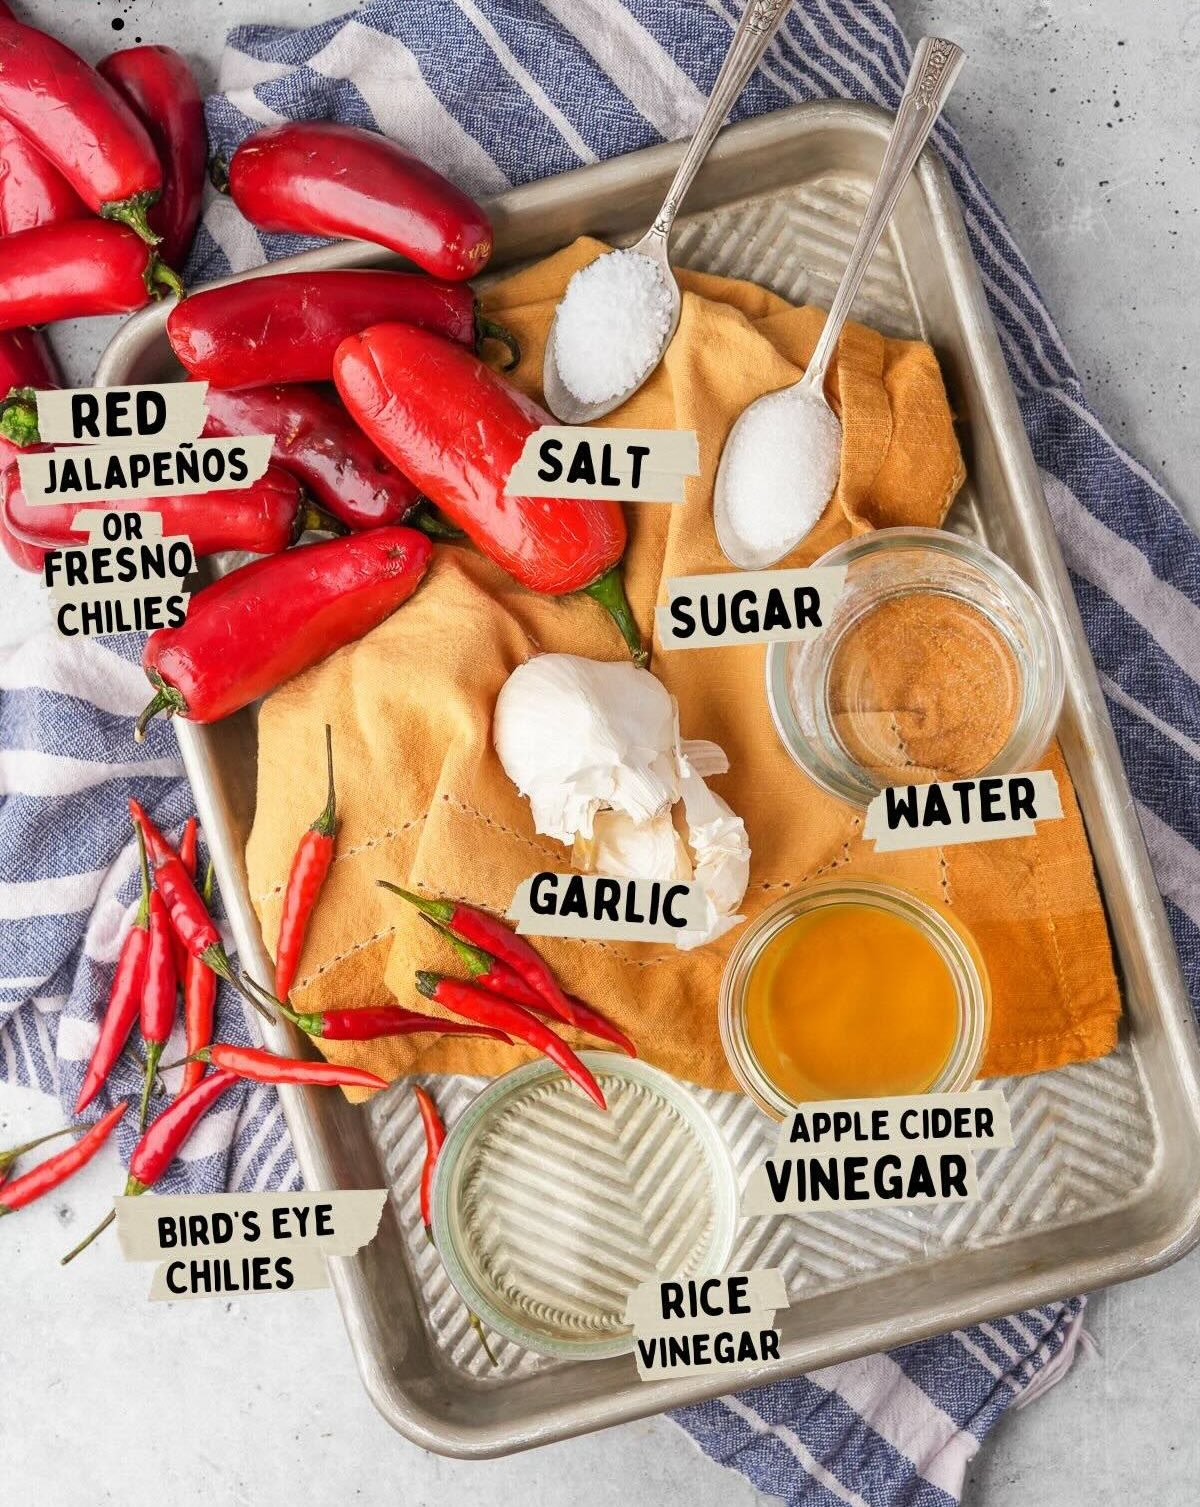
Red Jalapeños
Red jalapeños are simply picked at a slightly later time than their green brethren. This extra time on the vine makes them a bit sweeter and juicer. I have a bunch of Mexican grocery stores in my neighborhood that always have them available. But if you can't find them, you can make great sriracha with Fresno's or red serrano peppers instead.
Garlic
Garlic is sorta essential to the pungent, and complex flavor of sriracha. Sriracha is obviously smoother, but still uses just about as high a garlic ratio as my Szechuan-style chili garlic sauce recipe.
My recipe uses quite a bit of it, and you will notice that even though I am gonna have you blend the sauce, I have recommended a measurement of minced garlic. This is for the sake of consistent results, since garlic cloves come in all different sizes. Telling you to use a certain number cloves of garlic would give you different outcomes every time, and I am not about that. Makes sense, right?
Sugar
I have tested this sauce with all different kinds of sugar. At first, I thought a light brown sugar variety, especially coconut sugar or palm sugar (which I use in tons of Southeast Asian chili sauce recipes like nam Jim jaew) would be great. But after blind taste testing a bunch of different batches, I felt like regular cane sugar yields a flavor most like the store-bought sauce. Suffice to say, you can use just about any sweetener, but to emulate Huy Fong Sriracha, just keep it simple.
Salt
Salt is not just about flavor in sriracha. Because this is a fermented sauce, it inhibits some of the bad bacteria and slows down the fermentation process just enough to help the pepper's sweetness to develop without too much funkiness. This is the same purpose for the salt in the brining stage of vegan kimchi. So, pretty please, don't tinker with the salt amount in this recipe, ok? However, I've tested the recipe with sea salt, kosher salt, and even pink Himalayan salt, and they were pretty indistinguishable from one another in the side-by-side taste test I ran.
Vinegar
I have found that a careful balance of rice vinegar (which is my go-to for dairy-like tang in vegan sour cream and vegan nacho cheese) and apple cider vinegar provides just the right balance of fruity acidity that this sauce needs. But you can also make it with straight-up distilled white vinegar if that's what you have on hand, and the sauce will still be plenty yummy!
*See the recipe card at the bottom of the page for exact quantities, nutritional info, and detailed cooking directions.
🤯Variations
Original Thai Sriracha
Use lime juice in place of the rice vinegar, and tamarind paste in place of the apple cider vinegar to give your sriracha a tangy twist reminiscent of traditional Thai cuisine. This is an awesome version of sriracha to slather all over vegan drunken noodles, khao pad, or tom yum fried rice.
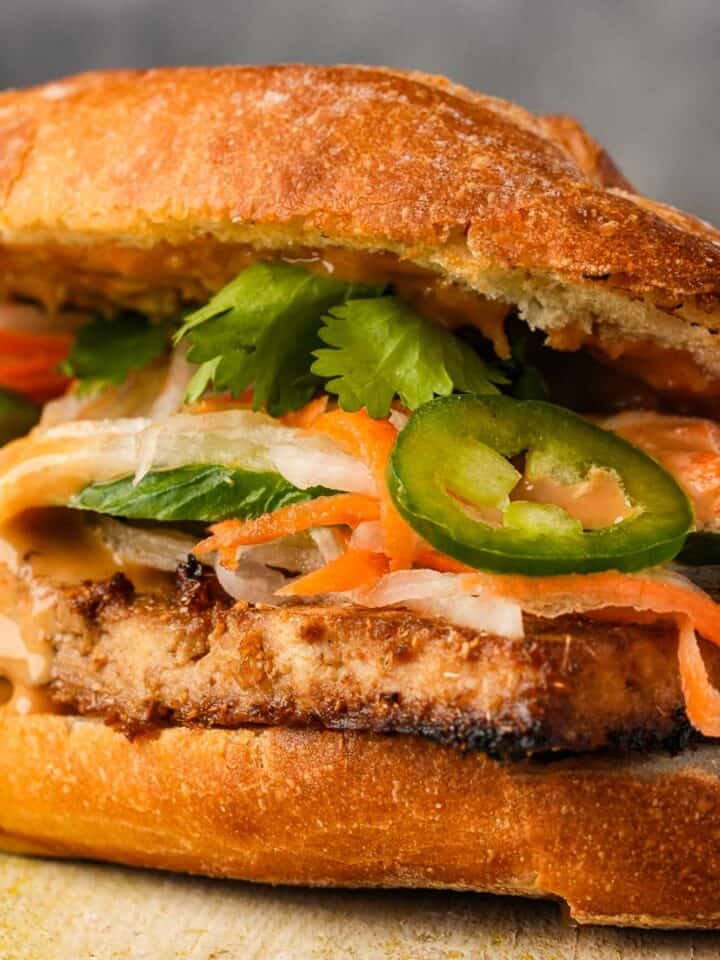
Sriracha Mayo
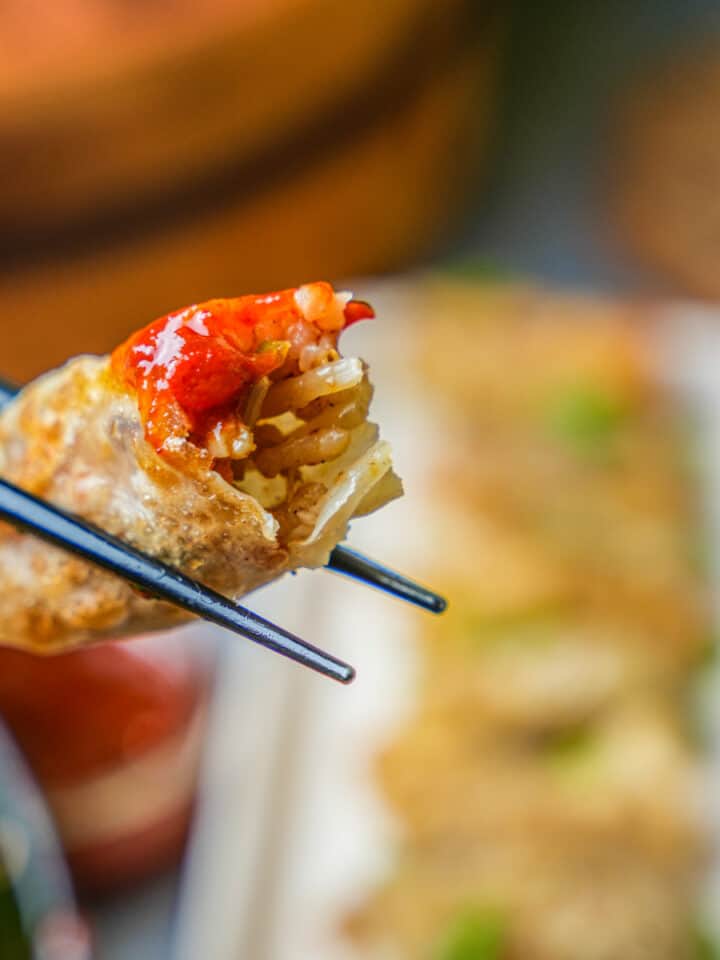
Mix 3 tablespoons of this sriracha sauce into a half cup of vegan kewpie mayo. It makes for the most epic sandwich spread, as you can see going on with my vegan banh mi recipe.
Vietnamese Sriracha
One way I have made this sauce for season 2 of my Galactic MegaStallion pop-ups is to add a hint of lemongrass and a dash of dark soy sauce to it. Simply add a ¼ cup of minced lemon grass when you blend the chilies, and then mix the dark soy sauce into the final product after it has been reduced on the stovetop. This hot sauce recipe is awesome for dipping banh bao chay into, or drizzling onto mi xao xi dau noodles.
📖 How to make Sriracha
Blow the store-bought stuff outta the dang water, even if it's your first time making hot sauce, by following these step-by-step photos with helpful tips. Or scroll down to the bottom of this page for the easy-to-print recipe card to make one of your favorite homemade condiments of all time!

Step One
Sterilize your jar:
Your sauce will likely go bad if you aren't using a freshly sterilized jar. Simply boil a pint-sized mason jar, along with its lid and band for 8 minutes, and then let it air dry on a clean wire rack. Keep it ready, and don't handle it unnecessarily.
Step Two
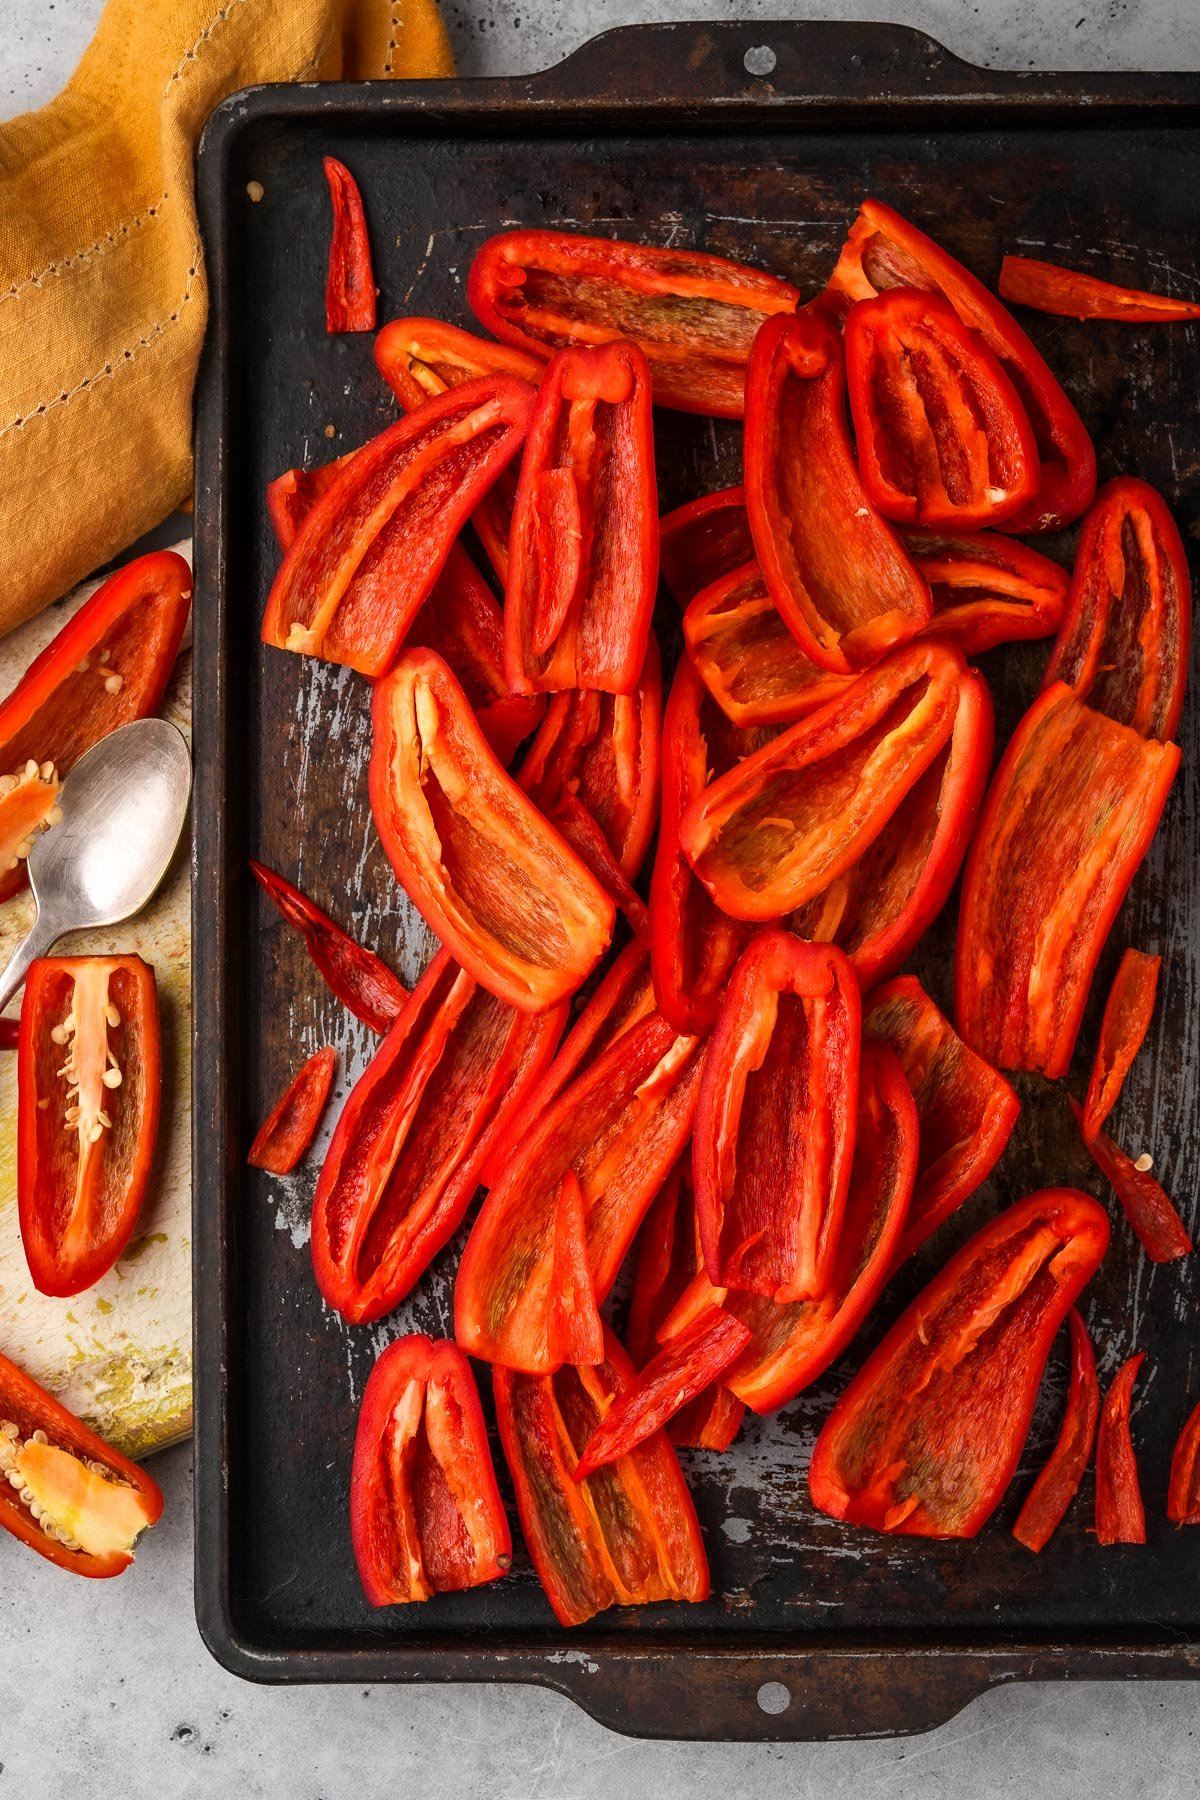
Pepper Prep Party:
Slice the red chili peppers in half, removing the green tops. To dial down the heat and avoid bitterness, discard all of the seeds and any white pith.
✅ Wear gloves to protect your skin from irritation. Even when I wear gloves, I still find ways to get a little pepper juice onto my forearms, which can burn for a little while. Just go into this a little bit at peace with the fact that the peppers might just punish you a little.
Step Three
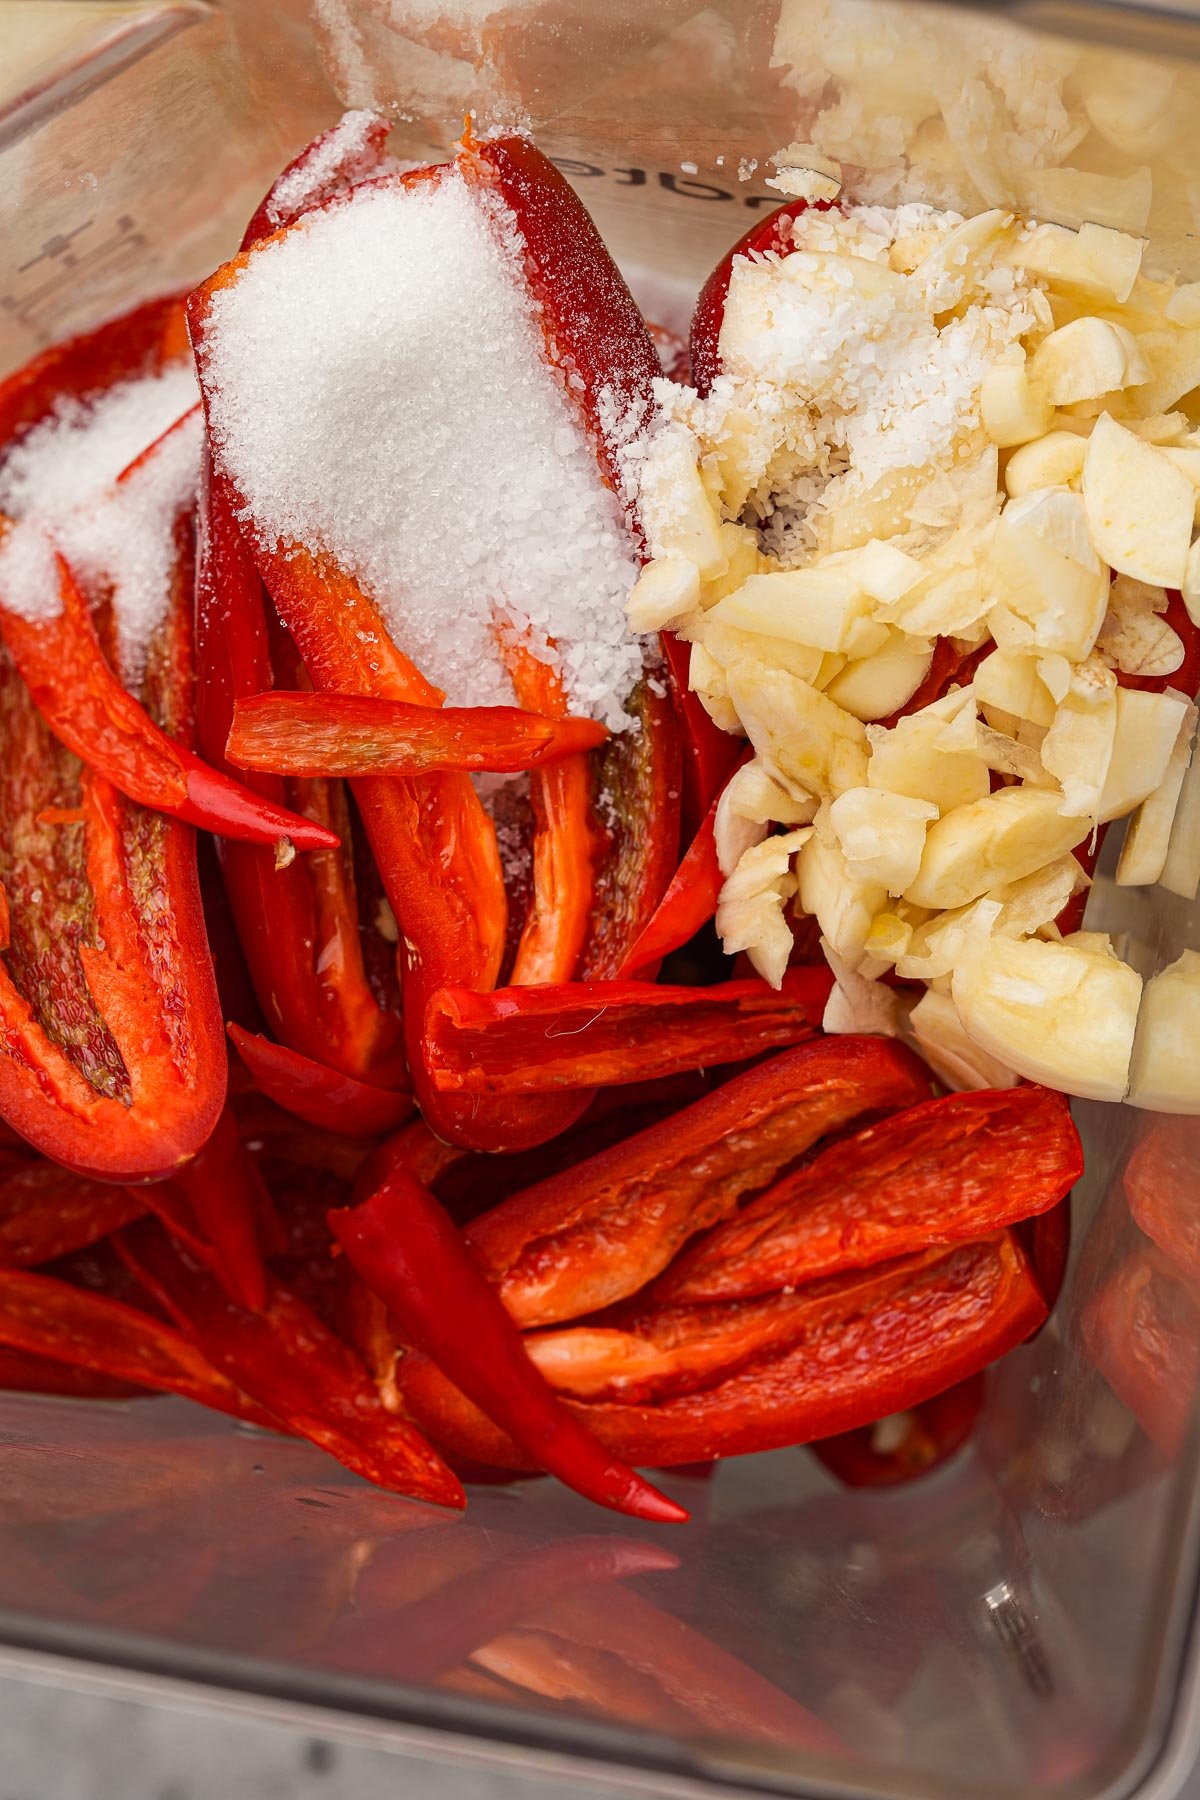
Blender Bash:
Add the prepped peppers, minced garlic, white sugar, salt, and water to a blender. Blend for 90 seconds on high speed until you achieve a smooth purée.
✅Using a decent high-speed blender like a Blendtec will make for a much smoother sauce that combines more quickly. A food processor will not create a smooth enough puree, and you will end up with more wasted peppers that will not fit through the strainer later on in this process.

Step Four
Load Up Your Jar:
Transfer the purée to a clean, sterile jar, tighten the lid, and let it ferment in a glass jar on the counter, away from direct sun. You don't have to keep it in a completely dark place, just out of direct sunlight.
✅Make sure there is at least a centimeter of space at the top of the jar to allow for expansion. If your blended batch is too big to comfortably fit in the jar, get rid of a couple of tablespoons of the blended sauce to avoid a mess as the sauce ferments.

Step Five
Burp Your Baby:
Burp the jar every twenty-four hours by slightly unscrewing the lid to release built-up gases, give the bottom of the jar a gentle tap on the counter to encourage air bubbles to rise, then re-tighten.
After 2-4 days, when the peppers are sweet, hot, and complex, proceed to the next step.

Step Six
Second Blend:
After a couple of days of fermentation, when the sauce has brightened and becomes sweeter, combine the fermented pepper sauce, unseasoned rice vinegar, and apple cider vinegar in a blender pitcher. Blend for 90 seconds on high speed until smooth.
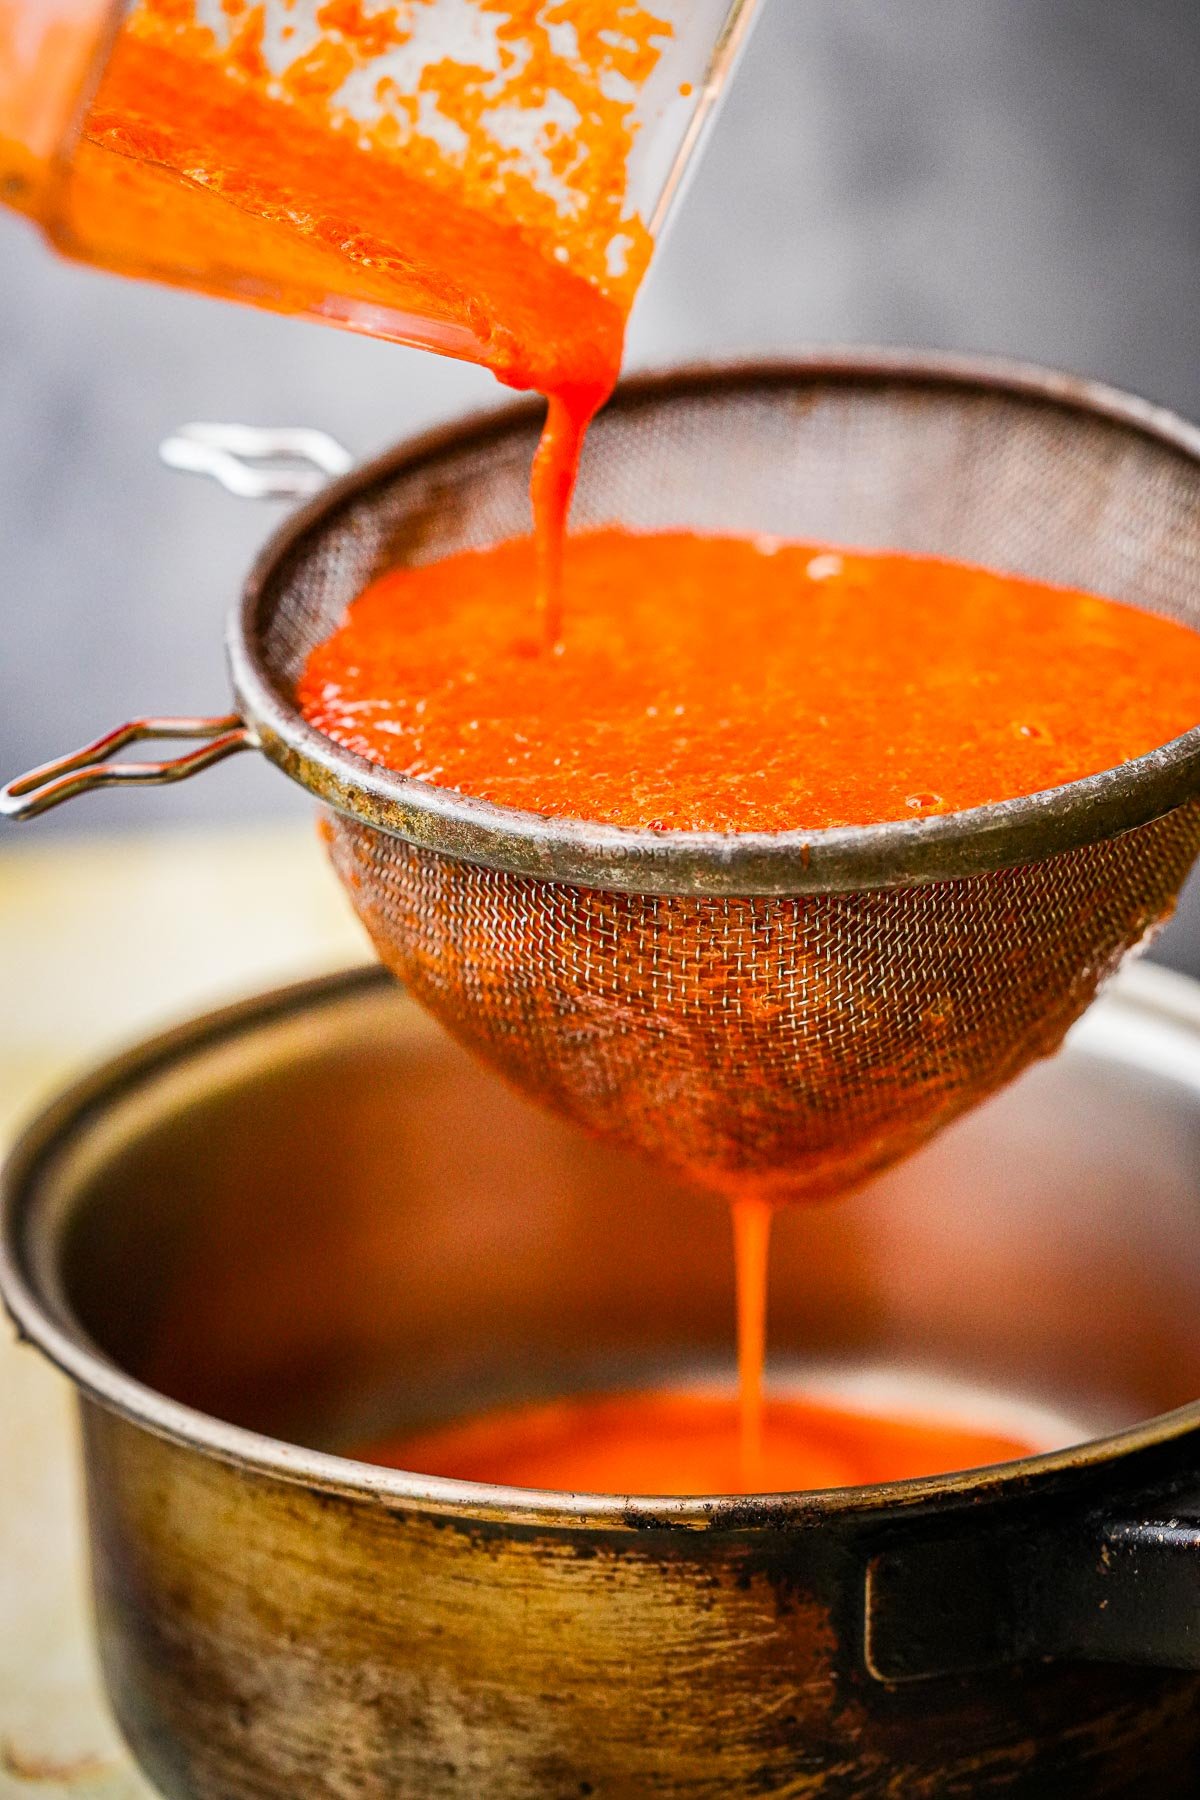
Step Seven
In Strain in the Membrane:
Strain the mixture through a fine-mesh strainer, or a nut-milk bag into a large saucepan.
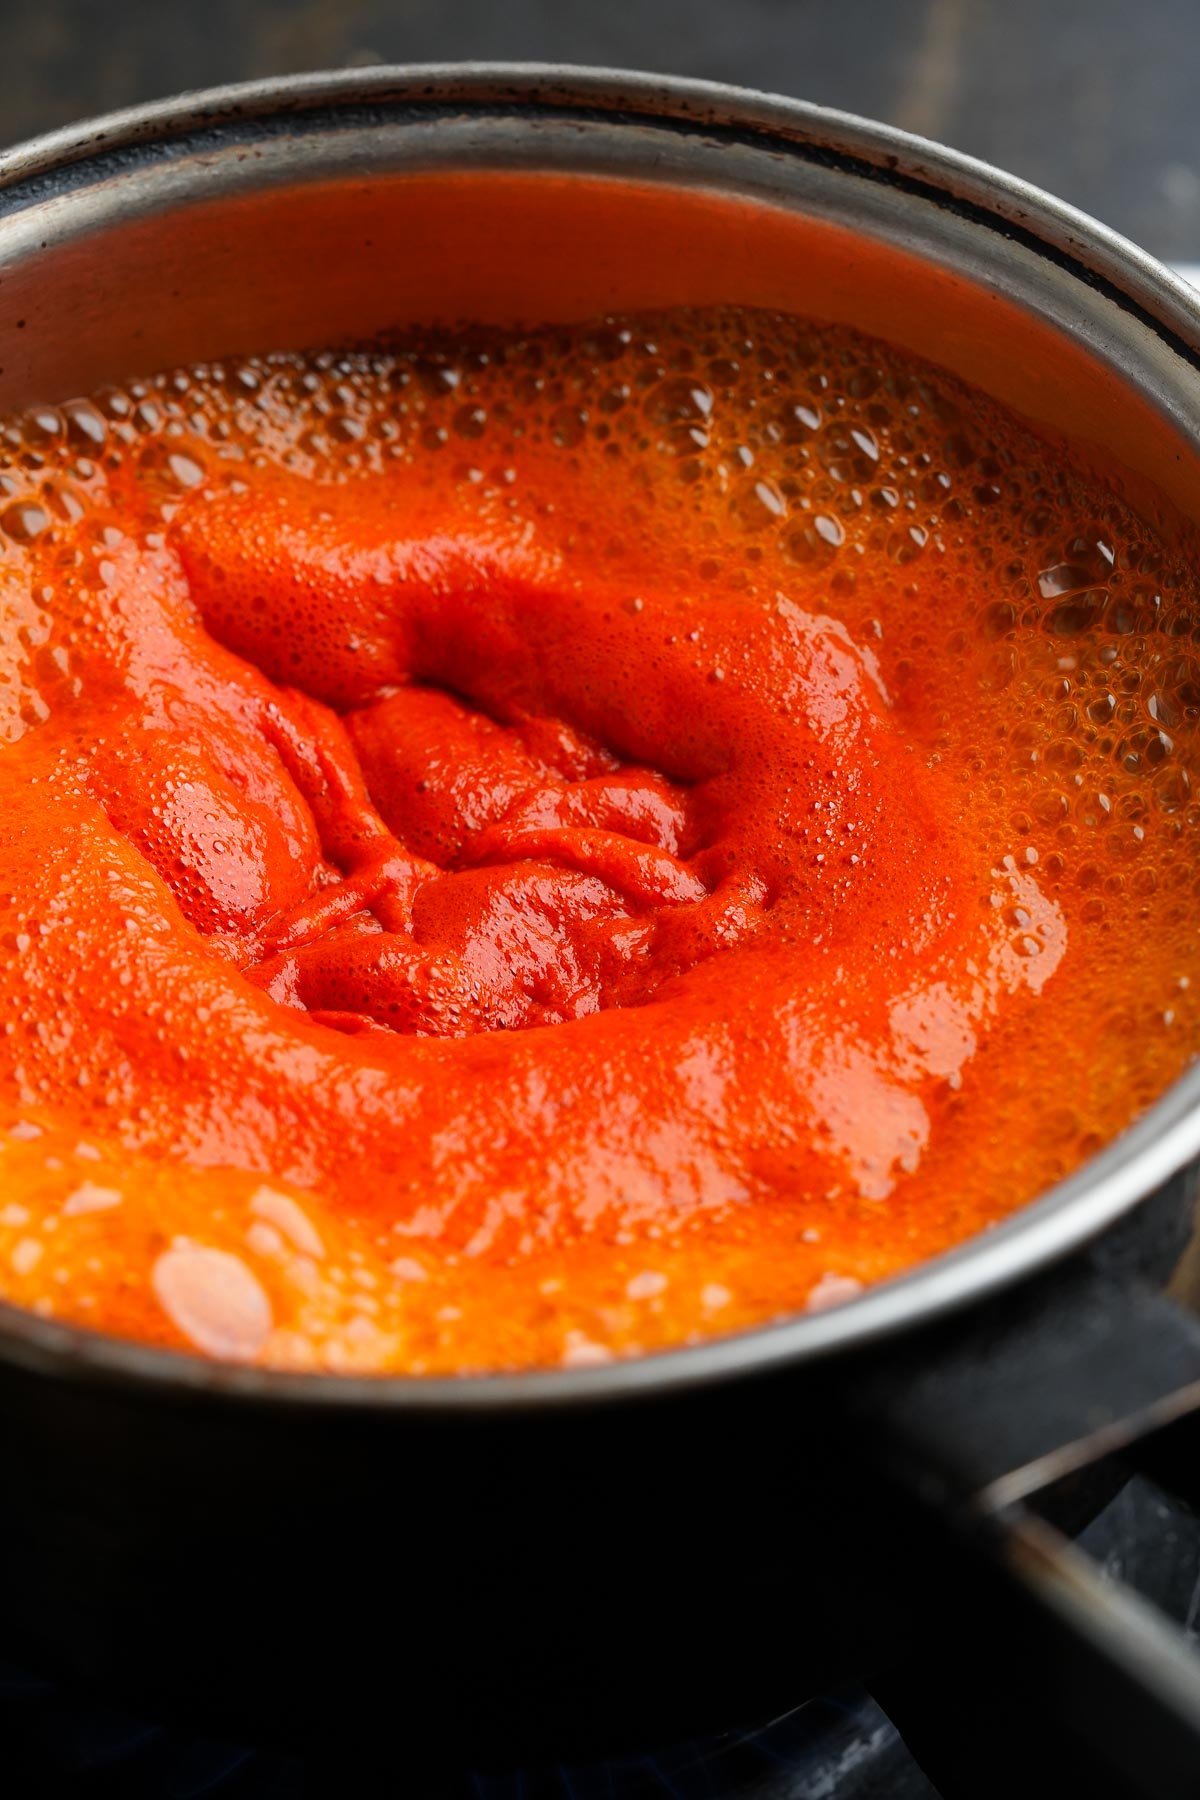
Step Eight
Sim Simmer, who's got the keys to my Bimmer?
Heat the strained sauce in a small pot over medium heat. Once boiling, decrease the heat and let it simmer for 6-8 minutes until slightly thickened and bubbling. Simmering for a little longer will make the sriracha more stable and extend its shelf life, though it will dull its vibrant red color.

Step Nine
Cool Down, Bottle Up
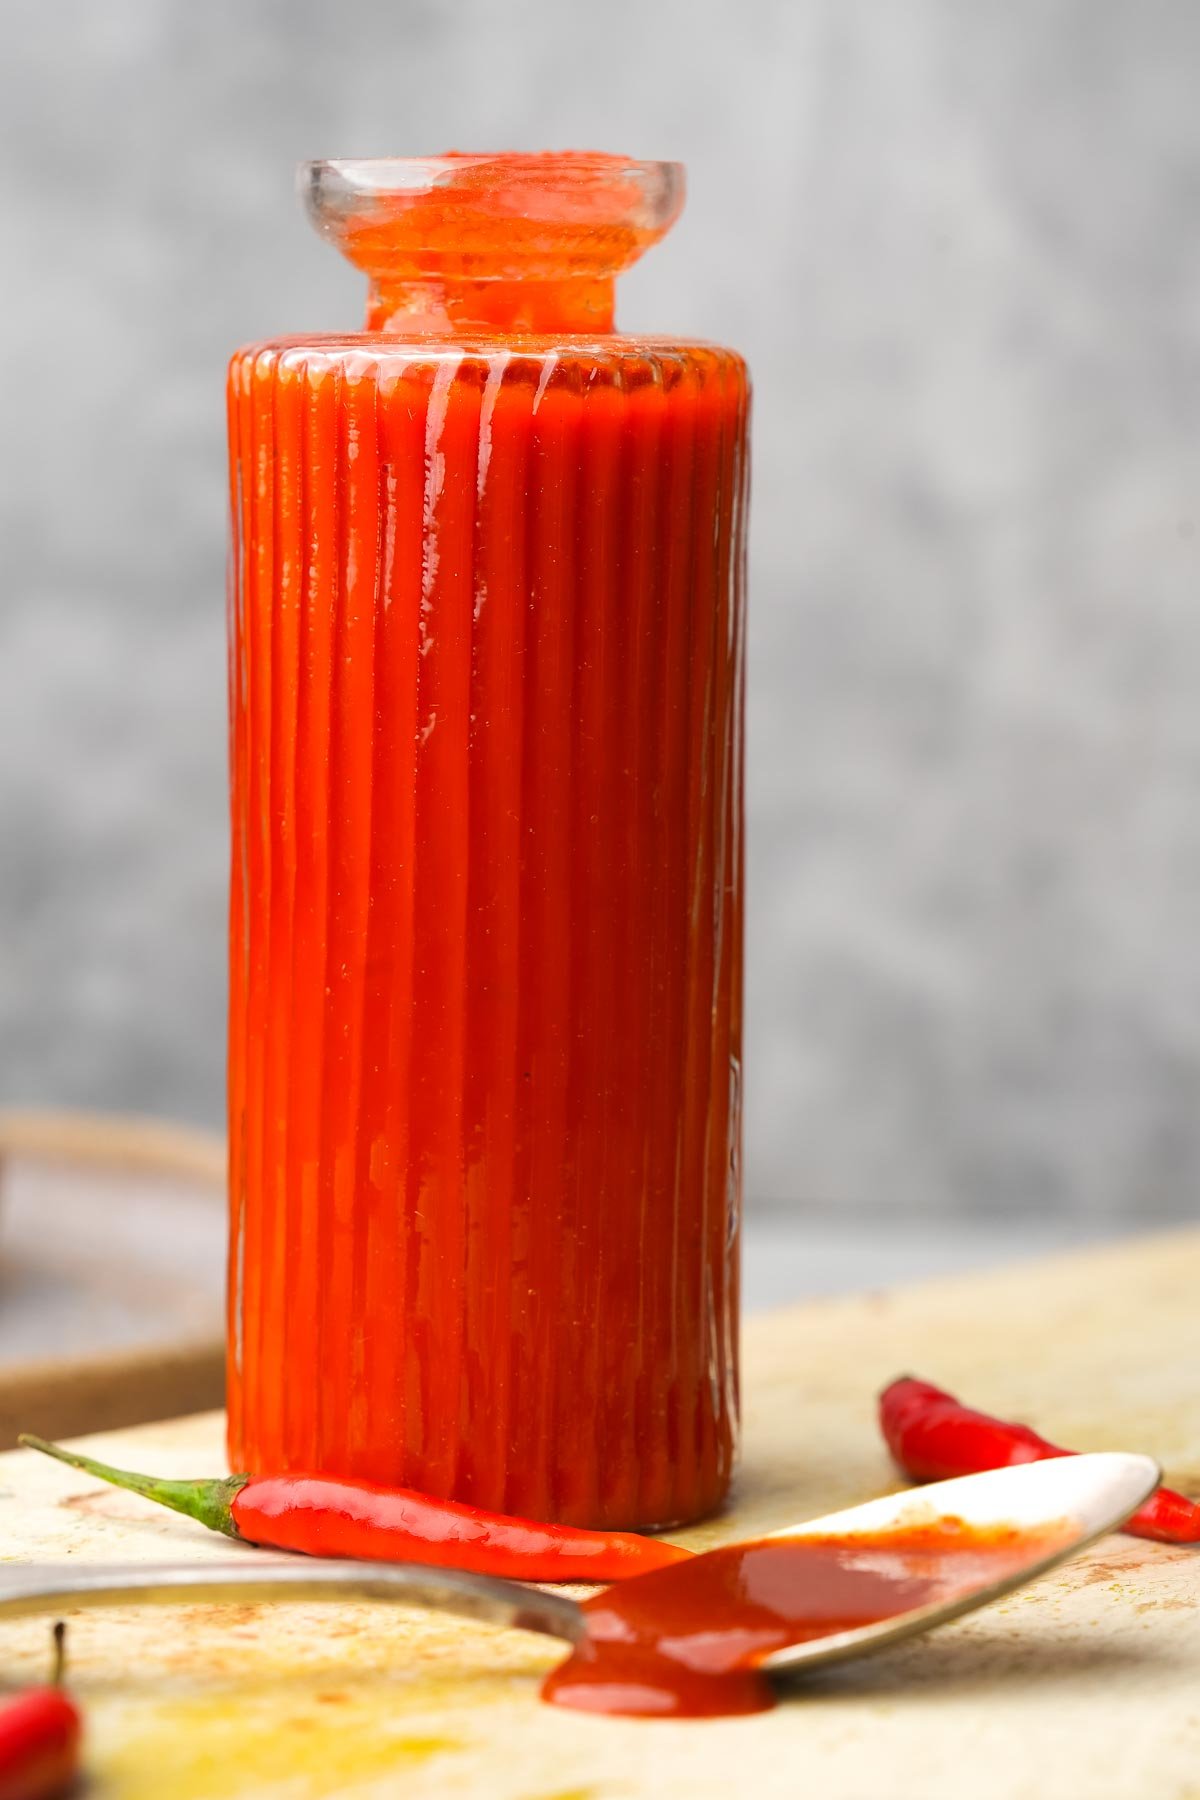
Remove the saucepan from heat and allow the sauce to fully cool to room temperature. Using a funnel, pour the hot sauce into a sterile bottle. Store it in the refrigerator, where it will keep for up to three months if properly stored and not brought into contact with unpasteurized food contaminants.
💡Serving Ideas
Your homemade version of sriracha can put a little sweet fire into just about any dang thing. I have even seen restaurants add a bit to caramel for ice cream sundaes, which is maybe just a little wilder and weirder than I want to mess with, but you do you. That sounds fun, you do you!
...But these are my top recommendations:
Noods: use sriracha in your fave stir-fried noodle dishes such as Thai pad woon sen, and vegan pad see ew, Indonesian bami goreng, bihun goreng, and mie goreng, Malaysian mee rubus, or even drip some onto steamed chee cheong fun rice noodles.
Sriracha also makes a fantastic dipping sauce for rice dumplings, Thai spring rolls, and Banh Trang Cuon, which are fresh Vietnamese salad rolls filled with herbs, veggies, and tofu.
Sriracha gives a great (and, in my opinion, NEEDED) boost to Filipino dishes like Adobong Sitaw with tofu and jackfruit "pork".

👉Top tips
- Fermentation Mastery: Fermentation is key to developing that signature sriracha flavor. Ensure your jar is not airtight during the fermentation process to allow gases to escape. "Burp" the jar every twenty-four hours by slightly unscrewing the lid to release the built-up gases, then re-tighten. This prevents pressure build-up, which could lead to a mess or even a broken jar.
- Room to Grow: If your initial blended batch is too big to comfortably fit in the jar, remove a couple of tablespoons of the blended pepper mash to avoid a mess as the sauce ferments. There should be at least a centimeter of space at the top of your jar to allow for expansion.
- Sterilize for Safety: Properly sterilize your jars to extend the shelf life of your sriracha. Boil your jars and lids in water for 8 minutes, then let them air dry on a clean towel. Alternatively, you can steam them in a pot with a steaming rack for 10 minutes.
- Don't be lazy! It's really important to take the time to remove all of the seeds and pith in the peppers. This will not only yield a smoother sauce, but it will also be milder and more flavorful. This will also reduce the astringent flavor that the seeds can bring to the sauce.
- Simmer for Stability: Simmering your sriracha after blending and straining helps to thicken the sauce and enhance its stability. Simmer over medium heat for six to eight minutes until the sauce slightly thickens and bubbles. This helps to mellow the flavors and ensures a smooth, consistent texture.
🤷♀️ Recipe FAQs
You can control the heat level by adjusting the amount of chili peppers used or by adding more or less vinegar to balance the heat. If you want it to be on the milder side, replace the bird's eye chilies (small Thai red chili peppers) in this recipe with more jalapeños rojos, or Fresno chilies.
Most commercial brands of sriracha are completely plant-based (and gluten-free too), but a few on the market use fish sauce. The best bet is to make your own, but if you are looking for a store bought one, the original, Huy Fong Sriracha Sauce and my favorite from Ninja Squirrel are completely vegan.
Yes, you can freeze homemade sriracha in ice cube trays or small containers for up to three months. Thaw in the refrigerator before using. As long as you don't introduce contaminants into the hot sauce, it has pretty good keeping quality under refrigeration anyway.
Yes, like any homemade condiment, sriracha can go bad if not stored properly or if kept for too long. Unlike pickles like amla ka achar, hari mirch ka achar, and avakaya pachadi, which are heavy in salt and preserved with oil, this sauce is not long-term impervious to mold growth. Additionally, no preservatives such as acetic acid, which appear in the ingredients list of manufactured brands, are in this recipe.
✌️What recipes use Sriracha in them?

Sriracha Sauce (This Easy Recipe Nails It!)
Equipment
- mason jar
- Funnel
- Bottle
Ingredients
- 400 grams red jalapeños stems removed
- 20 grams red bird's-eye chilies teas removed (about 15 peppers)
- ¼ cup garlic minced
- 2 tablespoons sugar
- 2 teaspoons salt
- ¼ cup water
- 3 tablespoons rice vinegar or white vinegar
- 4 teaspoons apple cider vinegar
Instructions
- Sterilize a pint-sized mason jar, along with its lid and band by boiling it for 8 minutes. Let the jar and lid air dry and cool on a clean wire rack.
- Slice the red peppers in half and remove the stems. To reduce heat and avoid bitterness or gritty texture, remove the seeds and any white ribs or pith using the tip of a knife or a sharp metal teaspoon. Wear gloves to avoid irritation from the peppers.
- Add the prepared peppers, minced garlic, sugar, salt, and water to a blender. Blend until a semi-smooth purée is achieved. Transfer the purée to a clean, sterile jar, tighten the cap, and let it ferment in a clean jar on the counter, away from direct sunlight.
- Burp the jar every 24 hours by slightly unscrewing the lid to release built-up gases, then re-tighten. After 2-4 days, when the peppers are sweet, hot, and complex, proceed to the next step. Never taste the sauce by using anything other than a very clean metal spoon so as not to introduce contaminants during fermentation.
- In a blender, combine the fermented pepper sauce, unseasoned rice vinegar, and apple cider vinegar. Blend until smooth. Strain the mixture through a fine mesh strainer, or a nut-milk bag into a large saucepan.
- Heat the strained sauce over medium heat. Once it comes to a boil, lower the heat and let it simmer for 6-8 minutes until slightly thickened and bubbling. Simmering for a little longer will make the sriracha more stable and extend its shelf life, though it will dull its vibrant red color.
- Remove the saucepan from heat and allow the sauce to fully cool to room temperature. Using a funnel, pour the hot sauce into a sterile bottle. Store your homemade sriracha in the refrigerator, where it will keep for up to three months if properly stored and not brought into contact with unpasteurized food contaminants.
Notes
Enter your email & I'll send it to your inbox. Plus, get great new recipes from me every week!
By submitting this form, you consent to receive emails from Cinnamon Snail.
Vban says
This is a ligit Sriracha! We love it!
Adam Sobel says
So glad you love the recipe! It took quite some tinkering to get just right.